[iptables] iptables 정리
All Pass Rule>
iptables -F
iptables -X
iptables -P INPUT ACCEPT
iptables -P OUTPUT ACCEPT
iptables -P FORWARD ACCEPT
F : Flush all Policy chains
X : Delete user defined chains
P : Set default policy
[출처 : https://en.wikipedia.org/wiki/Netfilter]
https://upload.wikimedia.org/wikipedia/commons/d/dd/Netfilter-components.svg

[Packet Flow 잘 설명된 곳 : 특히 bridge] 출처: https://wiki.mikrotik.com/wiki/Manual:Packet_Flow
출처2:New Diagram:https://wiki.mikrotik.com/wiki/Manual:Packet_Flow_v6

Examples


Ipsec Encryption/Decryption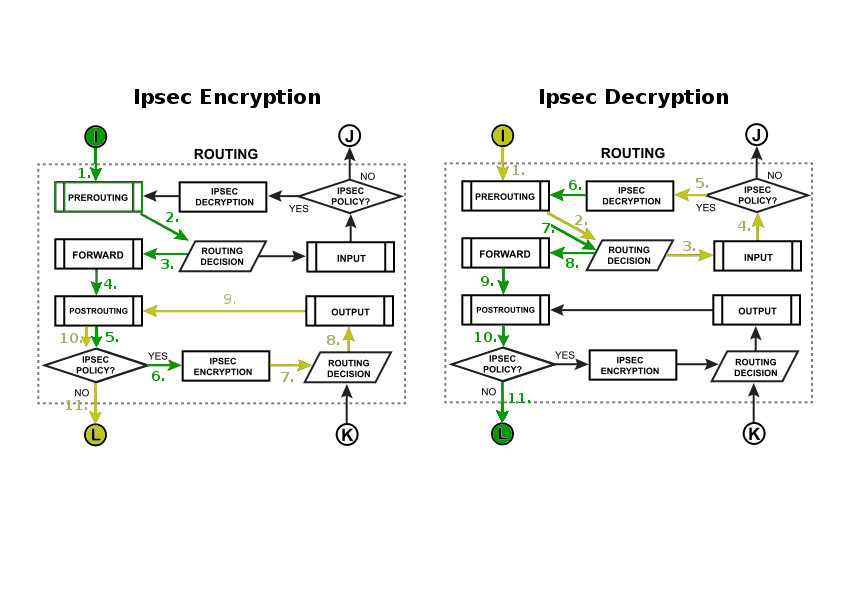

<이전 버전>
Diagram

[출처 : http://ebtables.netfilter.org/br_fw_ia/br_fw_ia.html#section6]
Table of Contents
- Introduction
- How frames traverse the ebtables chains
- A machine used as a bridge and a router (not a brouter)
- DNAT'ing bridged packets
- Chain traversal for bridged IP packets
- Using a bridge port in iptables rules
- Two possible ways for frames/packets to pass through the iptables PREROUTING, FORWARD and POSTROUTING chains
- IP DNAT in the iptables PREROUTING chain on frames/packets entering on a bridge port
- Using the MAC module extension for iptables
- Using the iptables physdev match module for kernel 2.6
- Detailed IP packet flow
1. Introduction
This document describes how iptables and ebtables filtering tables interact on a Linux-based bridge.
Getting a bridging firewall on a 2.4.x kernel consists of patching the kernel source code. The 2.6 kernel contains the ebtables and br-nf code, so it doesn't have to be patched. Because the demand was high, patches for the 2.4 kernel are still available at the ebtables homepage. The br-nf code makes bridged IP frames/packets go through the iptables chains. Ebtables filters on the Ethernet layer, while iptables only filters IP packets.
The explanations below will use the TCP/IP Network Model. It should be noted that the br-nf code sometimes violates the TCP/IP Network Model. As will be seen later, it is possible, f.e., to do IP DNAT inside the Link Layer.
We want to note that we are perfectly well aware that the word frame is used for the Link Layer, while the word packet is used for the Network Layer. However, when we are talking about IP packets inside the Link Layer, we will refer to these as frames/packets or packets/frames.
2. How frames traverse the ebtables chains
First thing to keep in mind is that we are talking about the Ethernet layer here, so the OSI layer 2 (Data link layer), or layer 1 (Link layer, Network Access layer) by the TCP/IP Network Model.
A packet destined for the local computer according to the bridge (which works on the Ethernet layer) isn't necessarily destined for the local computer according to the IP layer. That's how routing works (MAC destination is the router, IP destination is the actual box you want to communicate with).

Figure 2a. General frame traversal scheme
There are six hooks defined in the Linux bridging code, of which the BROUTING hook was added for ebtables.

Figure 2b. Ethernet bridging hooks
The hooks are specific places in the network code on which software can attach itself to process the packets/frames passing that place. For example, the kernel module responsible for the ebtables FORWARD chain is attached onto the bridge FORWARD hook. This is done when the module is loaded into the kernel or at bootup.
Note that the ebtables BROUTING and PREROUTING chains are traversed before the bridging decision, therefore these chains will even see frames that will be ignored by the bridge. You should take that into account when using this chain. Also note that the chains won't see frames entering on a non-forwarding bridge port.
The bridge's decision for a frame (as seen on Figure 2b) can be one of these:
- bridge it, if the destination MAC address is on another side of the bridge;
- flood it over all the forwarding bridge ports, if the position of the box with the destination MAC is unknown to the bridge;
- pass it to the higher protocol code (the IP code), if the destination MAC address is that of the bridge or of one of its ports;
- ignore it, if the destination MAC address is located on the same side of the bridge.

Figure 2c. Bridging tables (ebtables) traversal process
Ebtables has three tables: filter, nat and broute, as shown in Figure 2c.
- The broute table has the BROUTING chain.
- The filter table has the FORWARD, INPUT and OUTPUT chains.
- The nat table has the PREROUTING, OUTPUT and POSTROUTING chains.
Figures 2b and 2c give a clear view where the ebtables chains are attached onto the bridge hooks.
When an NIC enslaved to a bridge receives a frame, the frame will first go through the BROUTING chain. In this special chain you can choose whether to route or bridge frames, enabling you to make a brouter. The definitions found on the Internet for what a brouter actually is differ a bit. The next definition describes the brouting ability using the BROUTING chain quite well:
A brouter can be used, for example, to act as a normal router for IP traffic between 2 networks, while bridging specific traffic (NetBEUI, ARP, whatever) between those networks. The IP routing table does not use the bridge logical device, instead the box has IP addresses assigned to the physical network devices that also happen to be bridge ports (bridge enslaved NICs).
The default decision in the BROUTING chain is bridging.
Next the frame passes through the PREROUTING chain. In this chain you can alter the destination MAC address of frames (DNAT). If the frame passes this chain, the bridging code will decide where the frame should be sent. The bridge does this by looking at the destination MAC address, it doesn't care about the Network Layer addresses (e.g. IP address).
If the bridge decides the frame is destined for the local computer, the frame will go through the INPUT chain. In this chain you can filter frames destined for the bridge box. After traversal of the INPUT chain, the frame will be passed up to the Network Layer code (e.g. to the IP code). So, a routed IP packet will go through the ebtables INPUT chain, not through the ebtables FORWARD chain. This is logical.

Figure 2d. Incoming frame's chain traversal
Otherwise the frame should possibly be sent onto another side of the bridge. If it should, the frame will go through the FORWARD chain and the POSTROUTING chain. The bridged frames can be filtered in the FORWARD chain. In the POSTROUTING chain you can alter the MAC source address (SNAT).

Figure 2e. Forwarded frame's chain traversal
Locally originated frames will, after the bridging decision, traverse the nat OUTPUT, the filter OUTPUT and the nat POSTROUTING chains. The nat OUTPUT chain allows to alter the destination MAC address and the filter OUTPUT chain allows to filter frames originating from the bridge box. Note that the nat OUTPUT chain is traversed after the bridging decision, so this is actually too late. We should change this. The nat POSTROUTING chain is the same one as described above.

Figure 2f. Outgoing frames' chain traversal
3. A machine used as a bridge and a router (not a brouter)
Here is the IP code hooks scheme:

Figure 3a. IP code hooks
Here is the iptables packet traversal scheme.

Figure 3b. Routing tables (iptables) traversal process
Note that the iptables nat OUTPUT chain is situated after the routing decision. As commented in the previous section (when discussing ebtables nat), this is too late for DNAT. This is solved by rerouting the IP packet if it has been DNAT'ed, before continuing. For clarity: this is standard behaviour of the Linux kernel, not something caused by our code.
Figures 3a and 3b give a clear view where the iptables chains are attached onto the IP hooks. When the bridge code and netfilter is enabled in the kernel, the iptables chains are also attached onto the hooks of the bridging code. However, this does not mean that they are no longer attached onto their standard IP code hooks. For IP packets that get into contact with the bridging code, the br-nf code will decide in which place in the network code the iptables chains will be traversed. Obviously, it is guaranteed that no chain is traversed twice by the same packet. All packets that do not come into contact with the bridge code traverse the iptables chains in the standard way as seen in Figure 3b.
The following sections try, among other things, to explain what the br-nf code does and why it does it.
It's possible to see a single IP packet/frame traverse the nat PREROUTING, filter INPUT, nat OUTPUT, filter OUTPUT and nat POSTROUTING ebtables chains.
This can happen when the bridge is also used as a router. The Ethernet frame(s) containing that IP packet will have the bridge's destination MAC address, while the destination IP address is not of the bridge. Including theiptables chains, this is how the IP packet runs through the bridge/router (actually there is more going on, see section 6):

Figure 3c. Bridge/router routes packet to a bridge interface (simplistic view)
This assumes that the routing decision sends the packet to a bridge interface. If the routing decision sends the packet to non-bridge interface, this is what happens:

Figure 3d. Bridge/router routes packet to a non-bridge interface (simplistic view)
Figures 3c and 3d assume the IP packet arrived on a bridge port. What is obviously "asymmetric" here is that the iptables PREROUTING chain is traversed before the ebtables INPUT chain, however this cannot be helped without sacrificing functionality. See the next section.
4. DNAT'ing bridged packets
Take an IP packet received by the bridge. Let's assume we want to do some IP DNAT on it. Changing the destination address of the packet (IP address and MAC address) has to happen before the bridge code decides what to do with the frame/packet.
So, this IP DNAT has to happen very early in the bridge code. Namely before the bridge code actually does anything. This is at the same place as where the ebtables nat PREROUTING chain will be traversed (for the same reason). This should explain the asymmetry encountered in Figures 3c and 3d.
One should also be aware of the fact that frames for which the bridging decision would be the fourth from the above list (i.e. ignore the frame) will be seen in the PREROUTING chains of ebtables and iptables.
5. Chain traversal for bridged IP packets
A bridged packet never enters any network code above layer 1 (Link Layer). So, a bridged IP packet/frame will never enter the IP code. Therefore all iptables chains will be traversed while the IP packet is in the bridge code. The chain traversal will look like this:

Figure 5. Chain traversal for bridged IP packets
6. Using a bridge port in iptables rules
The wish to be able to use physical devices belonging to a bridge (bridge ports) in iptables rules is valid. Knowing the input bridge ports is necessary to prevent spoofing attacks. Say br0 has ports eth0 and eth1. Ifiptables rules can only use br0 there's no way of knowing when a box on the eth0 side changes its source IP address to that of a box on the eth1 side, except by looking at the MAC source address (and then still...). With the iptables physdev module you can use eth0 and eth1 in your iptables rules and therefore catch these attempts.
6.1. iptables wants to use the bridge destination ports:
To make this possible the iptables chains have to be traversed after the bridge code decided where the frame needs to be sent (eth0, eth1 or both). This has some impact on the scheme presented in section 3 (so, we are looking at routed traffic here, entering the box on a bridge port). It actually looks like this (in the case of Figure 3c):

Figure 6a. Chain traversal for routing, when the bridge and netfilter code are compiled in the kernel.
This is the work of the br-nf code. Obviously this does not mean that the routed IP packets never enter the IP code. They just don't pass any iptables chains while in the IP code.
6.2. IP DNAT for locally generated packets (so in the iptables nat OUTPUT chain):
The normal way locally generated packets would go through the chains looks like this:

Figure 6c. The normal way for locally generated packets
From section 6.1 we know that this actually looks like this (due to the br-nf code):

Figure 6d. The actual way for locally generated packets
Note that the iptables nat OUTPUT chain is traversed while the packet is in the IP code and the iptables filter OUTPUT chain is traversed when the packet has passed the bridging decision. This makes it possible to do DNAT to another device in the nat OUTPUT chain and lets us use the bridge ports in the filter OUTPUT chain.
7. Two possible ways for frames/packets to pass through the iptables PREROUTING, FORWARD and POSTROUTING chains
Because of the br-nf code, there are 2 ways a frame/packet can pass through the 3 given iptables chains. The first way is when the frame is bridged, so the iptables chains are called by the bridge code. The second way is when the packet is routed. So special care has to be taken to distinguish between those two, especially in the iptables FORWARD chain. Here's an example of strange things to look out for:
Consider the following situation

Figure 7a. Very basic setup.
The default gateway for 172.16.1.2 and 172.16.1.4 is 172.16.1.1. 172.16.1.1 is the bridge interface br0 with ports eth1 and eth2.
More details:
The idea is that traffic between 172.16.1.4 and 172.16.1.2 is bridged, while the rest is routed, using masquerading.

Figure 7b. Traffic flow for the example setup.
Here's a possible scheme to use at bootup for the bridge/router:
iptables -t nat -A POSTROUTING -s 172.16.1.0/24 -d 172.16.1.0/24 -j ACCEPT
iptables -t nat -A POSTROUTING -s 172.16.1.0/24 -j MASQUERADE

brctl addbr br0
brctl stp br0 off
brctl addif br0 eth1
brctl addif br0 eth2

ifconfig eth1 0 0.0.0.0
ifconfig eth2 0 0.0.0.0
ifconfig br0 172.16.1.1 netmask 255.255.255.0 up

echo '1' > /proc/sys/net/ipv4/ip_forward
The catch is in the first line. Because the iptables code gets executed for both bridged packets and routed packets, we need to make a distinction between the two. We don't really want the bridged frames/packets to be masqueraded. If we omit the first line then everything will work too, but things will happen differently. Let's say 172.16.1.2 pings 172.16.1.4. The bridge receives the ping request and will transmit it through its eth1 port after first masquerading the IP address. So the packet's source IP address will now be 172.16.1.1 and 172.16.1.4 will respond to the bridge. Masquerading will change the IP destination of this response from 172.16.1.1 to 172.16.1.4. Everything works fine. But it's better not to have this behaviour. Thus, we use the first line to avoid this. Note that if we would want to filter the connections to and from the Internet, we would certainly need the first line so we don't filter the local connections as well.
8. IP DNAT in the iptables PREROUTING chain on frames/packets entering on a bridge port
Through some groovy play it is assured that (see /net/bridge/br_netfilter.c) DNAT'ed packets that after DNAT'ing have the same output device as the input device they came on (the logical bridge device which we like to call br0) will go through the ebtables FORWARD chain, not through the ebtables INPUT/OUTPUT chains. All other DNAT'ed packets will be purely routed, so won't go through the ebtables FORWARD chain, will go through the ebtables INPUT chain and might go through the ebtables OUTPUT chain.
9. Using the MAC module extension for iptables
The side effect explained here occurs when the netfilter code is enabled in the kernel, the IP packet is routed and the out device for that packet is a logical bridge device. The side effect is encountered when filtering on the MAC source in the iptables FORWARD chains. As should be clear from earlier sections, the traversal of theiptables FORWARD chains is postponed until the packet is in the bridge code. This is done so we can filter on the bridge port out device. This has a side effect on the MAC source address, because the IP code will have changed the MAC source address to the MAC address of the bridge device. It is therefore impossible, in theiptables FORWARD chains, to filter on the MAC source address of the computer sending the packet in question to the bridge/router. If you really need to filter on this MAC source address, you should do it in the nat PREROUTING chain. Agreed, very ugly, but making it possible to filter on the real MAC source address in the FORWARD chains would involve a very dirty hack and is probably not worth it. This of course makes the anti-spoofing remark of section 6 funny.
10. Using the iptables physdev match module for kernel 2.6
The 2.6 standard kernel contains an iptables match module called physdev which has to be used to match the bridge's physical in and out ports. Its basic usage is simple (see the iptables man page for more details):
iptables -m physdev --physdev-in <bridge-port>and
iptables -m physdev --physdev-out <bridge-port>11. Detailed IP packet flow
Joshua Snyder (<josh_at_imagestream.com>) made a detailed picture about the IP packet flow on a Linux bridging firewall.
Jan Engelhardt made a more up to date picture, based on Joshua's picture.
Last updated November 9, 2003.
[출처 : https://ko.wikipedia.org/wiki/Iptables]
iptables는 IPv4에,
ip6tables는 IPv6에,
arptables는 ARP에,
ebtables는 이더넷 프레임에
Netfilter 그림 > https://commons.wikimedia.org/wiki/File:Netfilter-packet-flow.svg
[bridge check] in packet flow(above picture)
결론> br-ctl addif br0 eth0
all packets in eth0 port ==> br0
After IP assign to eth0
assigned ip packets ==> eth0
else ==> br0
The br0 interface is a pretend interface on the bridge.
It's treated like any other interface. <== 일반 I/F로 간주
So non-broadcast traffic from a MAC via p1 to a MAC via p1p2 doesn't transit interface br0
<== br0에 포함된 I/F들끼리 통신할 경우 br0까지 올라오지 않는다.(br0에서 확인 안됨)
(although it is obviously on bridge br0,
and it's a real shame Linux uses the same name for both the pseudo-interface and for the bridge).
참고> Bridged Firewalls : http://shorewall.net/bridge-Shorewall-perl.html
[구성]
Given the following setup on a router that performs NAT between two networks A and B:
- eth0 - physical interface - no ip address
- eth0.1 - VLAN interface for network A - no ip address
- eth0.2 - VLAN interface for network B - ip address for network B
- br0 - bridge - ip address for network A
- combines eth0.1 with other (irrelevant) interfaces
[Packet Flow]
After some experiments with tcpdump and iptables I've observed the following:
If a packet sent from network A to network B then tcpdump shows :
1. eth0: VLAN ID 1 tagged frame (4 bytes larger).
2. eth0.1: un-tagged frame
3. br0: same frame
5. eth0.2: NATed frame
Iptables:
1. br0 in
2. NAT
3. eth0.2 out
I *assume* qdiscs are processed in an order like this:
1. eth0 ingress
2. eth0.1 ingress
3. br0 ingress
4. br0 egress
5. eth0.1 egress
6. eth0 egress
[Protocol List]
- Default protocol : all
- specified protocol
tcp, udp, udplite, icmp, esp, ah, sctp or the special keyword "all"
- nemeric protocol value
https://www.iana.org/assignments/protocol-numbers/protocol-numbers.xhtml
- /etc/protocols
[출처 : http://seeaster.tistory.com/18 ]
중간에 개인적으로 내용 추가함.
오늘은 Iptables 에 대해 간단히 포스팅 하겠습니다. 그전에 몇가지 팁을 적어볼게요 ^^
옵션 보고 익히는 것보다 아래에 적은 팁이 실무에선 더 중요할 것 같네요.!!
Tip 7가지
1. Iptables 하면서 팁은 위에서부터 아래로 적용 됨
2. 명렁어 치기전엔 3번 생각하자
-쳐놓고 서비스 장애 등 가용성에 문제가 온다면 GG입니다
3. 신뢰 IP Any Any open 해놓고 작업하기
-ssh 등 원격 접속 해 있을 때 실수로 차단되면 콘솔로 붙어서 작업해야함.
-inbound 와 outbound 해야함(ssh 같은경우 inbound open만 해놓을경우 통신 불가)
4. 생각나는데로 룰 만드는 것이 아닌 먼저 정책 분석, 트래픽 분석하고 다 정리한다음 테스트 장비에 테스트 후 적용할 것.
-초기 셋팅이 아닌 서비스 중에 변경할 땐 더욱 신중해야함.
5. #]man iptables 를 이용할 것
-man 명령어로 명령어 옵션 보는 습관을 들이는 것이 좋습니다. 모든 명령어들어 옵션을 외울 수는 없지요. 물론 자주 쓰는 것은 외워두는 것이 좋습니다.
6. 일괄 적업하지 말 것.
-일괄작업 하면 빠르지만 하나하나씩 넣으면서 확인하는 습관을 길러야 합니다. 모든 보안 시스템은 일괄처리 기능이 제거되어있는데요 기계는 실수를 안하지만 사람은 항상 실수 하기 때문 입니다.
7. Vi 편집기로 /etc/sysconfig/iptables 편집하는 것이 더 편하다.
-저장하기전에 확인하고 확인할것!!또한 vi 편집기로 작업후 서비스 재시작 해줄 것!(service iptables restart)
*처음 룰 생성해서 저장 하기 전까지는 /etc/sysconfig/iptables 파일이 없습니다.
# iptables 명령어(옵션) 간단한 설명
~]#vi /etc/sysconfig/iptables
~]#iptables -L :리스트보기
--l : 각 라인 넘버 표시( -D로 룰 삭제시 사용 )
# iptables -L --line | head -10
Chain INPUT (policy ACCEPT)
num target prot opt source destination
1 ACCEPT all -- anywhere anywhere ctstate RELATED,ESTABLISHED
2 ACCEPT all -- anywhere anywhere
3 syn_flood tcp -- anywhere anywhere tcp flags:FIN,SYN,RST,ACK/SYN
4 input_rule all -- anywhere anywhere
5 input all -- anywhere anywhere
Chain FORWARD (policy DROP)
num target prot opt source destination
-v : verbose optio 차이
# iptables -L --line-numbers | tail -5
Chain zone_wan_forward (1 references)
num target prot opt source destination
1 forwarding_wan all -- anywhere anywhere
2 zone_wan_ACCEPT all -- anywhere anywhere
# iptables -L --line-numbers -v | tail -5
Chain zone_wan_forward (1 references)
num pkts bytes target prot opt in out source destination
1 6 312 forwarding_wan all -- any any anywhere anywhere
2 6 312 zone_wan_ACCEPT all -- any any anywhere anywhere
Filter 이 외의 Table 에 대한 리스트는 따로 봐야 한다.
(Default Table이 Filter이므로 Nat Table등은 명시를 해줘야 한다.)
iptables -t nat -L <== 대소문자 구분
# iptables -S | head -10-P INPUT ACCEPT
-P FORWARD DROP
-P OUTPUT ACCEPT
-N forward
-N forwarding_lan
-N forwarding_rule
-N forwarding_wan
-N input
-N input_lan
-N input_rule
~]#iptables -P INPUT DROP : -P 기본정책, INPUT의 기본정책을 DROP으로 하겠다.

현재 FORWARD 기본정책은 ACCEPT
~]#iptables -A : -A 는 추가할 때
~]#iptables -I INPUT 3 : -I 는 원하는 라인에 추가, 3번째 라인에 추가한다는말임.
~]#iptables -A INPUT -p tcp : -p 는 프로토콜 정하기
~]#iptables -A INPUT -p tcp -s : -s 는 src ip
~]#iptables -A INPUT -p tcp -s 192.168.81.63 --dport 80: --dport 는 dst port
~]#iptables -A INPUT -p tcp -d 192.168.81.62: -d 는 dst ip
~]#iptabels -A INPUT -p tcp --sport 80: --sport 는 src port
~]#iptables -A INPUT -p tcp -dport 80 -j ACCEPT : -j 는 대응 방법(ACCEPT, DROP, REJECT 등),
*REJECT는 DOS 공격시 부하가 걸리므로 권장하지 않음
~]#iptables -A INPUT –m : -m은 man 페이지를 참조 하길..옵션이 너무 많아요..
#서비스 시작/정지/재시작/저장
*iptables 는 save 명령어를 쳐주지 않으면 시스템 재부팅 후 정책이 초기화 됩니다.
~]#service iptables start
~]#service iptables stop
~]#service iptables restart
~]#service iptables save
[출처 : http://team.boanin.com/]
0. 기본정책을 ACCEPT로 설정
iptables -P INPUT ACCEPT
iptables -P OUTPUT ACCEPT
iptables -P FORWARD ACCEPT
1. 현재 자신의 방화벽 규칙을 볼 수 있는 명령
iptables -L
iptables --list
2. 21.23.25.80 포트를 차단하는 정책(각각 하나씩 규칙을 만들것)
iptables -A INPUT -p tcp --dport 21 -j DROP
iptables -A INPUT -p tcp --dport 23 -j DROP
iptables -A INPUT -p tcp --dport 25 -j DROP
iptables -A INPUT -p tcp --dport 80 -j DROP
iptables -A INPUT -p tcp -m multiport --destination-port 21,23,25,80 -j DROP
3.첫번째 정책을 삭제
라인넘버 확인 : iptables -L --line
iptabels -D INPUT 1
4. 세번째 정책의 출발지 IP를 192.168.1.0/24로 수정
iptables -R INPUT 3 -p tcp -s 192.168.1.0/24 --dport 80 -j DROP
5. 출발지 IP가 A클래스 사설 IP 일 경우 차단하는 정책
iptables -A INPUT -s 10.0.0.0./8 -j DROP
6. 출발지 IP 192.168.10.1 부터 192.168.10.100, 그리고 192.168.150.0/24이고 목적지IP 는 192.168.10.170이고 목적지 포트는 3306일 경우 차단하는 정책
iptables -A INPUT -p tcp -s 192.168.150.0/24 -d 192.168.10.170 --dport 3306 -j DROP
iptables -A INPUT -p tcp -m iprange --src-range 192.168.10.1-192.168.10.100 -d 192.168.10.170 --dport 3306 -j DROP
7. tcp 패킷이 초당 10개가 올경우 차단하는 정책(limit match 이용)
iptables -A INPUT -p tcp -m limit --limit 10/s -j DROP
8. 하나의 세션에서 10개의 패킷이 매치된 후 tcp 패킷이 분당 100개가 올 경우 차단하는 정책
iptables -A INPUT -p tcp -m limit --limit 100/m --limit-burst 10 -j DROP
9. 옆사람의 윈도우와 리눅스에서 SSH 접속을 차단하도록 설정, 윈도우에서 연결은DROP, 리눅스는 REJECT
iptables -A INPUT -p tcp -s 172.17.24.140 --dport 22 -j DROP
iptables -A INPUT -p tcp -s 172.17.24.170 --dport 22 -j REJECT --reject-with tcp-reset
10. ICMP 라는 체인을 생성
-icmp 패킷이 들어올 경우 ICM 체인으로 전달
-icmp 체인에 ping에 대한 응답하지 않는 정책 추가
iptables -N ICMP
iptables -A INPUT -p icmp -j ICMP
iptables -A ICMP -p icmp --icmp-type 8 -j DROP
11. 기본정책을 DROP으로 설정
iptables -P INPUT DROP
iptables -P OUTPUT DROP
iptables -P FORWARD DROP
본인의 윈도우에서 ssh연결이 되도록 설정하고 이미 연결된 상태나 연광성이 있는 연결은 별도의 정책 대신 state 매치를 이용하여 계쏙 사용할수 있도록 설정
iptables -I INPUT -m state --state ESTABLISHED, RELATED -j ACCEPT
iptables -A INPUT -p tcp -s 172.17.24.130 --dport 22 -j ACCEPT
12. TCP FLAG 중 전체를 보고 그 중 SYN 과 FIN이 있을 경우 차단하는 정책
iptables -A INPUT -p tcp --tcp-flags ALL SYN,FIN -j DROP
13. TCP FLAG 중 전체를 보고 그 중 PSH 과 FIN이 있을 경우 차단하는 정책
iptables -A INPUT -p tcp --tcp-flags ALL FIN,FIN -j DROP
14.TCP FLAG 중 PSH와 SYN을 보고 그 중 둘 다 있을 경우 차단하는 정책
15.SYN 패킷이 아닌데 상태가 NEW일 경우 차단하는 정책
iptables -A INPUT -p tcp ! --syn -m state --state NEW -j DROP
iptables -A INPUT -p tcp ! --tcp-flags SYN,RST,ACK SYN -m state --state NEW -j DROP
iptables -A INPUT -p tcp ! --tcp-flags ALL SYN -m state --state NEW -j DROP
tcp flags:!FIN,SYN,RST,ACK/SYN state NEW
tcp flags:!SYN,RST,ACK/SYN state NEW
tcp flags:!FIN,SYN,RST,PSH,ACK,URG/SYN state NEW
[ip6tables]
ip6tables -A INPUT -p icmpv6 --icmpv6-type router-advertisement -j DROP
ip6tables -A FORWARD -i eth0 -p icmpv6 --icmpv6-type router-advertisement -j DROP
[ebtables]
### filter> INPUT
# Block DHCPv6 server packets from AP
# ==> Block DHCPv6 client packets to AP
# DHCPv6 Server port : 547
# DHCPv6 Client port : 546
ebtables -A INPUT -i $WAN_DEV -p ipv6 --ip6-prot udp --ip6-sport 546 -j DROP
### filter> OUTPUT
# Block RA from LAN or AP to WAN
BRIDGE_MAC=$(ifconfig $BRIDGE | grep HWaddr|awk '{print$5}')
#br-lan => Bridge_OUTPUT => Physical I/F OUTPUT
#ebtables -A OUTPUT -o $WAN_DEV -s $BRIDGE_MAC -p ipv6 --ip6-proto ipv6-icmp --ip6-icmp-type router-advertisement -j DROP
ebtables -A OUTPUT -o $WAN_DEV -p ipv6 --ip6-proto ipv6-icmp --ip6-icmp-type router-advertisement -j DROP
### filter> FORWARD
# Block ipv4 & arp packets from LAN to WAN
WAN_MAC=$(ifconfig $WAN_DEV | grep HWaddr|awk '{print$5}')
ebtables -A FORWARD -o $WAN_DEV -s ! $WAN_MAC -p arp -j DROP
ebtables -A FORWARD -o $WAN_DEV -s ! $WAN_MAC -p ipv4 -j DROP
# Block DHCPv6 server packets from AP
# ==> Block DHCPv6 client packets to AP
# DHCPv6 Server port : 547
# DHCPv6 Client port : 546
ebtables -A FORWARD -i $WAN_DEV -p ipv6 --ip6-prot udp --ip6-sport 546 -j DROP
[ebtables --help ipv6]
/# ebtables --help ip6
ebtables v2.0.10-4 (December 2011)
Usage:
ebtables -[ADI] chain rule-specification [options]
ebtables -P chain target
ebtables -[LFZ] [chain]
ebtables -[NX] [chain]
ebtables -E old-chain-name new-chain-name
Commands:
--append -A chain : append to chain
--delete -D chain : delete matching rule from chain
--delete -D chain rulenum : delete rule at position rulenum from chain
--change-counters -C chain
[rulenum] pcnt bcnt : change counters of existing rule
--insert -I chain rulenum : insert rule at position rulenum in chain
--list -L [chain] : list the rules in a chain or in all chains
--flush -F [chain] : delete all rules in chain or in all chains
--init-table : replace the kernel table with the initial table
--zero -Z [chain] : put counters on zero in chain or in all chains
--policy -P chain target : change policy on chain to target
--new-chain -N chain : create a user defined chain
--rename-chain -E old new : rename a chain
--delete-chain -X [chain] : delete a user defined chain
--atomic-commit : update the kernel w/t table contained in <FILE>
--atomic-init : put the initial kernel table into <FILE>
--atomic-save : put the current kernel table into <FILE>
--atomic-file file : set <FILE> to file
Options:
--proto -p [!] proto : protocol hexadecimal, by name or LENGTH
--src -s [!] address[/mask]: source mac address
--dst -d [!] address[/mask]: destination mac address
--in-if -i [!] name[+] : network input interface name
--out-if -o [!] name[+] : network output interface name
--logical-in [!] name[+] : logical bridge input interface name
--logical-out [!] name[+] : logical bridge output interface name
--set-counters -c chain
pcnt bcnt : set the counters of the to be added rule
--modprobe -M program : try to insert modules using this program
--concurrent : use a file lock to support concurrent scripts
--version -V : print package version
Environment variable:
EBTABLES_ATOMIC_FILE : if set <FILE> (see above) will equal its value
ip6 options:
--ip6-src [!] address[/mask]: ipv6 source specification
--ip6-dst [!] address[/mask]: ipv6 destination specification
--ip6-tclass [!] tclass : ipv6 traffic class specification
--ip6-proto [!] protocol : ipv6 protocol specification
--ip6-sport [!] port[:port] : tcp/udp source port or port range
--ip6-dport [!] port[:port] : tcp/udp destination port or port range
--ip6-icmp-type [!] type[[:type]/code[:code]] : ipv6-icmp type/code or type/code range
Valid ICMPv6 Types:
destination-unreachable
no-route
communication-prohibited
address-unreachable
port-unreachable
packet-too-big
time-exceeded (ttl-exceeded)
ttl-zero-during-transit
ttl-zero-during-reassembly
parameter-problem
bad-header
unknown-header-type
unknown-option
echo-request (ping)
echo-reply (pong)
router-solicitation
router-advertisement
neighbour-solicitation (neighbor-solicitation)
neighbour-advertisement (neighbor-advertisement)
redirect
Standard targets: DROP, ACCEPT, RETURN or CONTINUE;
The target can also be a user defined chain.
Supported chains for the filter table:
INPUT FORWARD OUTPUT
[참고] http://itwiki.kr/w/%EB%A6%AC%EB%88%85%EC%8A%A4_iptables
[출처 : http://5log.tistory.com/190 http://5log.tistory.com/191]
방화벽 ( Firewall ) _ iptables ( 패킷 필터링 )
방화벽( Firewall )_ iptables ( NAT )
- 관련 용어
Firewall ( 방화벽 )
IPS ( 칩입 차단 시스템 )
IDS ( 침입 탐지 시스템 )
각 서비스 Wall (EX: 웹 방화벽 ( WAF ), 스팸 차단 시스템 )
Client -- Firewall -- IPS/IDS -- WAF --> WEB Server
- 방화벽 설정 툴의 종류
# system-config-securitylevel
# system-config-securitylevel-tui ( # lokkit )
# iptables CMD , /etc/sysconfig/iptables
- 네트워크 접근 제어 툴
tcp_wrappers
모든 서비스를 제어하지 않는다. ( TCP 서비스 중에서 일부 서비스를 제어한다.
네트워크 서비스 제어 성능을 떨어뜨리지 않는다.
설정이 단순하다.
단일 서비스 또는 몇 개의 서비스만 제어하는 경우 사용하면 좋다.
iptables
모든 서비스 제어가 가능하다.
네트워크 서비스 제어 성능이 떨어진다.
설정이 복잡하다.
네트워크 전체적인 서비스 제어할 때 사용한다.
- iptables 기본 구조
넷필터(netfilter) 프로젝트에서 개발 했으며 광범위한 프로토콜 상태 추적, 패킷 애플리케이션 계층검사, 속도제한, 필터링 정책을 명시하기 위한 강력한 매커니즘을 제공한다.
kernel 2.2 ( ipchains ) -> kernel 2.4 ( iptables ) -> kernel 2.6 ( iptables )
[주의] ipchains 과 iptables을 동시에 사용하면 안된다.
- 구조

라우팅 결정
패킷의 목적지 주소가 로컬 시스템에 해당되면, 패킷은 로컬 프로세스에 의해 처리되도록 라우팅된다. 패킷이 다른 시스템에 전달될 때 커널에서 패킷 포워딩이 활성화되어 있으면(/proc/sys/net/ipv4/ip_forward), 패킷은 라우팅 테이블 정보에 따라 목적지로 전달된다.
패킷 필터링
지점패킷 필터링은 커널 안의 다섯 개의 필터링 지점에서 발생한다. 필터링 지점 이름은 대소문자를 구별하며 모두 대문자로 이루어진 것에 주의하여야 한다.
PREROUTING 처음 전달 받은 패킷을 처리하는 필터링 지점(nat)
FORWARD 로컬 시스템을 통해 경유되는 패킷을 처리하는 필터링 지점(filter)
INPUT 라우팅 결정 후에 로컬 시스템으로 향하는 패킷을 처리하는 필터링 지점(filter)
OUTPUT 보내기 프로세스를 떠난 패킷을 POSTROUTING 전에 처리하는 필터링 지점(nat/filter)
POSTROUTING 시스템을 떠나기 바로 전의 패킷을 처리하는 필터링 지점(nat)
- 개요
논리적인 3개의 chains 로 구성되어 있고, 각각 INPUT, OUTPUT, FORWARD 라는 이름을 가지고 있다.
관리자가 정의하여 새로운 사슬을 생성 가능 하다. ( 기본 사슬의 이름은 대문자 이다. )
INPUT 사슬 : 리눅스 박스를 향해 들어오는 패킷들이 거치는 체인
FORWARD 사슬 : 리눅스 박스를 거쳐 OUTPUT 체인을 향하는 체인
OUTPUT 사슬 : 리눅스 박스를 나가는 패킷들이 들어가는 체인
- 정책 개요
방화벽 = 패킷 필터링 + NAT
들어오는 패킷을 순서대로 정의된 Rule 들을 점검하고 처음 일치 되는 규칙을 적용한다. ]
하나의 필터링 규칙에 여러가지 조건으로 지정하면 모든 조건에 일치해야 규칙 적용이 된다.
사용자 정의 체인의 경우 일치 항목이 없을 경우에는 제어권은 사용자 정의 체인이 호출되었던 체인으로 다시 돌아간다.
규칙 타겟 ( Rule Target )
ACCEPT : 패킷을 허용하는 옵션이다. (Allow)
DROP : 패킷을 완전히 무시한다. (Deny)
REJECT : 패킷을 허용하지 않는다는 메세지를 보내면서 거부한다. 사슬 전체 정책 설정(-P)에서는 사용할 수 없다.
패킷을 버리고 이와 동시에 적절한 응답 패킷을 전송한다.
LOG : 시스템 로그 커널 장치로 연결한다. 패킷을 syslog에 기록한다.
사용자 정의 체인 : 사용자가 정의하는 체인이다.
[참고] 방화벽은 IP, Port , Protocol, 패킷 특성을 확인한다.
연결 추적 ( Connection Tracking )
내부 네트워크 상 서비스 연결 상태에 따라서 그 연결을 감시하고 제한할 수 있게 해준다.
연결 추적 방식은 연결 상태를 표에 저장하기 때문에, 다음과 같은 연결 상태에 따라서 시스템 관리자가 연결을 허용 하거나 거부할 수 있다.
NEW — 새로운 연결을 요청하는 패킷, 예, HTTP 요청
ESTABLISHED — 기존 연결의 일부인 패킷
RELATED — 기존 연결에 속하지만 새로운 연결을 요청하는 패킷, 예를 들면 접속 포트가 20인 수동 FTP의 경우 전송 포트는 사용되지 않은
1024 이상의 어느 포트라도 사용 가능하다.
INVALID — 연결 추적표에서 어디 연결에도 속하지 않은 패킷
- iptables 명령어
전체 사슬에 대한 설정 ( 대문자, -P, -L , -N , -X 등 )
각 사슬에 대한 규칙 (Rule ) 설정 ( 소문자 , -s, -d, -p 등 )
전체 사슬에 대한 옵션
| 옵션 | 설명 |
|
| -N | 새로운 사슬을 만든다. # iptables -N NEW |
|
| -X | 사슬을 제거한다. # iptables -X NEW # iptables -X ( 이름을 지정하지 않으면 모두 삭제 ) |
|
| -P | 사슬의 정책을 설정한다. # iptables -P INPUT (DROP / ACCEPT) |
|
| -L | 현재 사슬의 규칙을 나열한다. # iptables -L # iptables -vL ( 더 자세히 ) # iptables -L INPUT ( INPUT 만 나열 ) |
|
| -F | 사슬로부터 규칙을 제거한다. # iptables -F # iptables -F INPUT |
|
| -Z | 사슬내의 모든 규칙의 패킷과 바이트의 카운트를 0으로 만든다. # iptables -Z | |
사슬 내부 규칙에 대한 옵션
| 옵션 | 설명 |
|
| -A | 사슬에 새로운 규칙을 추가한다. 해당 사슬에 맨 마지막 규칙으로 등록된다. |
|
| -I | 사슬에 규칙을 맨 첫부분에 설정한다. (대문자 i ) |
|
| -R | 사슬의 규칙을 교환한다. |
|
| -D | 사슬의 규칙을 제거한다. |
|
필터링 지정
-s(Source IP), -d(Destination IP) ( DNS 이름으로 지정 불가 )
-j(jump)
-!
-p(Protocol)
-i(In-interface), -o(Out-interface)
-t(Tables)
--sport(Source Port), --dport(Destination Port)
- iptables 설정 스크립트
/etc/sysconfig/iptables 파일을 사용하지않고 스크립트를 만들어서 사용한다.
실습 환경 ) Linux ( CentOS 5.X redhat , kernel 2.6 , ip = 192.168.10.100 )
# vi /root/bin/iptables.sh
| #!/bin/bash iptables -F -t filter iptables -F -t nat # # (1) Local ACCEPT # iptables -A INPUT -i lo -j ACCEPT iptables -A INPUT -m state --state ESTABLISHED,RELATED -j ACCEPT # # (2) Policy # iptables -A INPUT -m state --state NEW -p tcp -s 192.168.10.200 -d 192.168.10.100 --dport 23 -j ACCEPT iptables -A INPUT -m state --state NEW -p tcp -s 192.168.10.0/24 -d 192.168.10.100 --dport 22 -j ACCEPT iptables -A INPUT -p icmp --icmp-type echo-request -s 192.168.10.100 -d 0/0 -j ACCEPT iptables -A INPUT -p icmp --icmp-type echo-reply -s 0/0 -d 192.168.10.100 -j ACCEPT iptables -A INPUT -m state --state NEW -p tcp -s 0/0 -d 192.168.10.100 --dport 80 -j ACCEPT # # (3) All DROP # iptables -P INPUT DROP |
|
1. Local
> local 에서 접속하는 것들은 모두 ACCEPT
> -m state --state ESTABLISHED,RELATED
연결이 이미 되어 잇는 것, 연결 중인 것은 ACCEPT ( iptable 은 송수신을 모두 설정해야하는대 이런식으로 설정하면 한줄로 설정이 가능하다.)
2. Policy
> 192.168.10.100 서버에 23번 포트로 접속하려는 192.168.10.200 는 허용 / telnet
> 192.168.10.0/24 대역이 22번 포트로 접속하려는 것은 허용 / ssh
> 192.168.10.100 서버는 0/0 ( 어디든 ) echo- request 가능 / ping
> 0/0 어떤 IP도 192.168.10.100 에 echo-reply 전송 가능 / ping
> 0/0 어떤 IP도 192.168.10.100 에 echo-unreachable 전송 가능 / ping
> 0/0 어떤 IP도 192.168.10.100 서버에 80 포트로 접속 허가 / httpd
3. DROP
> 위 조건들 이외에는 모두 drop
[참고]
telnet 서비스는 암호화 통신을 하지 않기 때문에 네트워크 대역을 허용하는 것보다 특정 IP를 지정하는 것이 좋다.
ssh 는 암호화 통신을 하기 때문에 대역을 지정해도 괜찮다.
웹 서비스는 모두 다 이용해야 하기 때문에 모든 IP를 허용한다. ( WAF 같은 보안 장비에 맡긴다. )
자신의 서버에서는 외부로 ping test가 되지만 자신의 서버로 ping test를 막아둔다. ( EX : naver )
[참고] 각 서비스들에 대한 제어 예제
(주의) 반드시 source ip 부분이나 destination ip 부분의 지정이 필요하다.
- (WEB) HTTP -- TCP 80
iptables -A INPUT -p tcp -m tcp --dport 80 -j ACCEPT
- (WEB) HTTPS -- TCP 443
iptables -A INPUT -p tcp -m tcp --dport 443 -j ACCEPT
iptables -A INPUT -m state --state NEW -m tcp -p tcp -m multiport --dports 80,443 -j ACCEPT
- (DB) MySQL(MariaDB) -- TCP 3306
iptables -A INPUT -p tcp --dport 3306 -j ACCEPT
- (FTP) active mode -- TCP 21,20
iptables -A INPUT -p tcp --dport 21 -j ACCEPT
iptables -A INPUT -p tcp --dport 20 -j ACCEPT
- (FTP) passive mode -- TCP 21, 1024-65535
iptables -A INPUT -p tcp --dport 21 -j ACCEPT
iptables -A INPUT -p tcp --dport 1024:65535 -j ACCEPT
- (MAIL) SMTP -- TCP 25
iptables -A INPUT -p tcp -m tcp --dport 25 -j ACCEPT
- (MAIL) Secure SMTP -- TCP 465
iptables -A INPUT -p tcp -m tcp --dport 465 -j ACCEPT
- (MAIL) POP3 -- TCP 110
iptables -A INPUT -p tcp -m tcp --dport 110 -j ACCEPT
- (MAIl) Secure POP3 -- TCP 995
iptables -A INPUT -p tcp -m tcp --dport 995 -j ACCEPT
- (MAIl) IMAP -- TCP 143
iptables -A INPUT -p tcp -m tcp --dport 143 -j ACCEPT
- (MAIl) Secure IMAP -- 993
iptables -A INPUT -p tcp -m tcp --dport 993 -j ACCEPT
- (ICMP) ICMP 허용 (ping)
iptables -A INPUT -p icmp --icmp-type echo-request -j ACCEPT
iptables -A OUTPUT -p icmp --icmp-type echo-reply -j ACCEPT
- (NTP) -- UDP 123
iptables -A INPUT -p udp --dport 123 -j ACCEPT
- (DHCP) -- UDP 67,68
iptables -A INPUT -p udp --dport 67:68 –j ACCEPT
- (SAMBA) -- TCP 445, 137,138,139
iptables -A INPUT -m state --state NEW -p tcp --dport 445 –j ACCEPT
iptables -A INPUT -m state --state NEW -p tcp --dport 137:139 –j ACCEPT
- NAT 의 종류
SNAT(Source NAT) : Source IP 주소 변경
DNAT(Destination NAT): Destination IP 주소 변경
- SNAT & DNAT
| -i eth0 -o eth0 PREROUTING --> 라우팅 ----------------->POSTROUTING-----> (D-NAT) | (S-NAT) | ^ | | +-------> 로컬 프로세스 -----+ |
|
- SNAT
소스의 주소를 1.2.3.4로 변경하는 예
# iptables -t nat -A POSTROUTING -o eth0 -j SNAT --to 1.2.3.4
| S-IP | S-Port | D-IP | D-port |
| S-IP | S-Port | D-IP | D-Port |
|
| 192.168.0.10 | 30000 | www.daum.net | 80 |
| 1.2.3.4 | 30000 | www.daum.net | 80 |
|
| 192.168.0.11 | 30000 | www.daum.net | 80 |
| 1.2.3.4 | 30001 | www.daum.net | 80 |
|
| 192.168,0.12 | 30000 | www.daum.net | 80 |
| 1.2.3.4 | 30002 | www.daum.net | 80 |
|
소스의 주소를 1.2.3.4 ~ 1.2.3.6 로 변경하는 예
#iptables -t nat -A POSTROUTING -o eth0 -j SNAT --to 1.2.3.4-1.2.3.6
| S-IP | S-Port | D-IP | D-port |
| S-IP | S-Port | D-IP | D-Port |
|
| 192.168.0.10 | 30000 | www.daum.net | 80 |
| 1.2.3.4 | 30000 | www.daum.net | 80 |
|
| 192.168.0.11 | 30000 | www.daum.net | 80 |
| 1.2.3.5 | 30000 | www.daum.net | 80 |
|
| 192.168,0.12 | 30000 | www.daum.net | 80 |
| 1.2.3.6 | 30002 | www.daum.net | 80 |
|
소스의 주소를 1.2.3.4에 포트 1-1023으로 변경하는 예
#iptables -t nat -A POSTROUTING -o eth0 -j SNAT --to 1.2.3.4:1-1023
| S-IP | S-Port | D-IP | D-port |
| S-IP | S-Port | D-IP | D-Port |
|
| 192.168.0.10 | 30000 | www.daum.net | 80 |
| 1.2.3.4 | 887 | www.daum.net | 80 |
|
| 192.168.0.11 | 30000 | www.daum.net | 80 |
| 1.2.3.4 | 888 | www.daum.net | 80 |
|
| 192.168,0.12 | 30000 | www.daum.net | 80 |
| 1.2.3.4 | 889 | www.daum.net | 80 |
|
마스쿼레이딩 설정 ( SNAT 방식의 특이한 경우 )
SNAT 는 외부로 통신할때 내부의 사설IP에서 공인 IP로 바꿔주는 역할을 한다.
하지만 일반 가정집과 같이 공인IP가 지정된 것이 아니라 DHCP 서버에서 할당 받는다면 공인 IP가 변경될 수 있다.
-> 지정된 공인 IP로 설정하는 iptables로는 설정이 불가능 하다.
-> 마스쿼레이딩은 IP를 지정하지 않고 외부로 나가는 NIC 카드를 지정하여 그때마다 지정된 NIC 카드의 IP를 부여한다.
# iptables -t nat -A POSTROUTING -o ppp0 -j MASQUERADE
-> SNAT는 주로 고정 IP 방식에서 사용(eth0 : 회사가 보유한 고정/공인 IP)
-> DNAT는 주로 유동 IP 방식에서 사용(ppp0 : 통신 회사가 제공하는 유동/공인 IP)
- DNAT
| S-IP | S-Port | D-IP | D-port |
| S-IP | S-Port | D-IP | D-Port |
|
| www.daum.net | 80 | 1.1.1.1 | 30000 |
| www.daum.net | 80 | 192.168.0.10 | 30000 |
|
| www.daum.net | 80 | 1.1.1.1 | 30001 |
| www.daum.net | 80 | 192.168.0.11 | 30001 |
|
| www.daum.net | 80 | 1.1.1.1 | 30002 | www.daum.net | 80 | 192.168.0.12 | 30002 |
|
목적지 주소를 1.2.3.4로 변경하는 경우
# iptables -t nat -A PREROUTING -i eth1 -j DNAT --to 1.2.3.4
목적지 주소를 1.2.3.4-1.2.3.6 로 변경하는 경우
# iptables -t nat -A PREROUTING -i eth1 -j DNAT --to 1.2.3.4-1.2.3.6
웹 트래픽에 대한 목적지 주소를 1.2.3.4의 8080 포트로 변경하는 경우
# iptables -t nat -A PREROUTING -p tcp --dport 80 -i eth0 -j NAT --to 1.2.3.4:8080
방향 재 설정 (Redirect) - Local Port Forwarding
# iptables -t nat -A PREROUTING -i eth1 -p tcp --dport 80 -j REDIRECT --to-port 3128
외부에서 80번 포트로 tcp 패킷이 들어오면 먼저 3128 포트로 보낸다.
> 3128 포트에는 보통 패킷을 분석하기 위해 대기중인 프로그램이 존재한다. > 그리고 다시 80 포트로 보낸다.
> 자신의 포트로 잠깐 바꾸는 것이기 때문에 IP를 설정할 필요가 없다.
- 정리
■ MASQERADE 설정 -> (예) firewall 서버에서 설정
# iptables -t nat -A POSTROUTING -o eth0 -j MASQUERADE
■ Network interface(eth0)을 통한 Port Forwarding
# iptables -t nat -A PREROUTING -p tcp -i eth0 --dport ${port} -j DNAT --to ${IP:Port}
■ 특정 IP를 통한 Port Forwarding
# iptables -t nat -A PREROUTING -p tcp -i eth0 -d ${IP} -j DNAT --to-destination ${IP:Port}
■ Local Port Forwarding -> (예) sslstrip
# iptables -t nat -A PREROUTING -p tcp -d ${IP} --dport ${Port} -j REDIRECT --to-port ${Port}
[Tables]
[출처 : http://yahon.tistory.com/173]
iptables 에서 table의 종류
하거나 삭제할 수 없으며 그럴 필요도 없다. 즉, 3개의 테이블 안에서 모든 처리를 하는 것이다.
그러나 table의 하위 개념인 chain은 별도로 생성하거나 또는 삭제하는 것이 가능하다. 만약
특정 table을 지정하려면 -t 또는 --table 이라는 옵션을 사용하면 되는데, 별도로 지정하지 않
을 때는 기본적으로 filter 테이블로 인식된다
1. filter 테이블
방화벽의 주된 테이블로서 특정 룰에 따라서 패킷을 걸러내거나 통과시키는 역할을 한다.
filter 테이블에는 기본적으로 3개의 chain이 있는데, INPUT, FORWARD, OUTPUT이 그것이
다. 여기서 INPUT은 외부에서 방화벽 자체로 향하는 패킷에 대한 필터링을 담당며,FORWAR
D는 방화벽 자체가 아닌 방화벽을 통과하여 방화벽이 보호하는 다른 서버 등으로 향하는 패킷
에 대한 필터링, OUTPUT은 방화벽에서 나가는 패킷에 대한 필터링을 담당한다.
즉, 한 대의 리눅스 서버 자체 내에서 웹 서비스 등 일반 서비스와 함께 패킷 필터링을 제공하고
자 할 경우 FORWARD는 사용하지 않고, INPUT과 OUTPUT chain만 사용하면 될 것이다.
반대 로 리눅스를 전용 방화벽 장비로 설정하여 스위치나 서버의 앞단에 설치함으로써 리눅스
서버 내부의 Window 서버나 다른 유닉스 계열 서버 등을 보호하고자 할 경우에는 FORWARD
chain을 사용하여 내부의 서버들에 대한 패킷 필터링 정책을 설정하면 될 것이다. 물론 이러한
경우에도 방화벽 자체에 대한 필터링도 설정하여야 하는데, 이 때에는 INPUT chain을 사용하
여야 한다.
2. nat 테이블
nat테이블은 패킷을 필터링하거나 패킷으 ttl등 특성을 변환하는 기능은 없으며 단지 방화벽으
로 향하는 패킷을 방화벽이 보호하는 내부 네트워크의 다른 주소로 포워딩 하거나 방화벽 내부
네트워크에서 방화벽을 통해 외부 네트워크로 나갈 때 다른 ip주소로 변환시켜 주는 역할을 한
다. nat에서는 POSTROUTING과 PREROUTING chain이 주로 사용된다.
POSTROUTING은 Source NAT(SNAT)타겟과 매칭되어 내부 네트워크에서 방화벽을 통해 외
부로 나갈 때 사용되며, PREROUTING은 Destination NAT(DNAT)타겟과 매칭되어 주로 외
부에서 방화벽 내부 서버로 향하는 패킷을 방화벽이 보호하는 내부서버로 포워딩 할 때 사용
된다.
즉, POSTROUTING은 사무실 등에서 사설ip를 사용하면서 하나의 공인 ip로 인터넷을 공유하
고자 할 때 즉 공유기의 용도로 사용할 수 있고, PREROUTING은 사설 ip로 서버를 운영하면서
외부로 서비스를 하고자 할 때 사용된다.
3. mangle 테이블
자주 사용되지는 않지만 패킷의 TTL이나 TOS 값을 변경할 때 사용된다. mangle테이블은
PREROUTING과 OUTPUT chain으로 이루어져 있는데, PREROUTING에서는 라우팅 경로가
결정되기 전에 방화벽으로 들어오는 패킷에 대해 변경하고, OUTPUT chain에서는 내부에서
생성된 패킷이 방화벽을 통해 나갈 때 변경한다
[출처 : https://www.lesstif.com/pages/viewpage.action?pageId=18219518]
리눅스 커널에 탑재되어 있는 netfilter는 테이블(talbe) 또는 정책 목록(rules lists) 이라 불리우는 다섯 가지의 패킷 필터링 설비를 갖고 있다.
filter네트워크 패킷을 처리하기 위한 기본 테이블로 INPUT, OUTPUT, FORWARD 세 개의 내장 체인을 갖고 있다.nat네트워크 주소 변환(NAT- Network Address Translation) 을 처리하기 위한 테이블이다.mangle특별한 패킷(TCP 헤더의 QOS 비트등)을 변경하는데 사용되는 테이블이다.raw테이블의 연결 추적 기능을 더 상세하게 처리할 수 있으며 특정 패킷은 추적하지 않는 등의 설정이 가능한 테이블이다.security
SELinux 의 강제 접근 통제(MAC - Mandatory Access Control)를 지원하기 위한 정책이다.
각각의 테이블은 내장된 체인 그룹을 갖고 있으며 각 체인은 패킷과 일치하는 규칙의 목록이다. filter 테이블은 다음 세 가지 체인을 갖고 있다.
- INPUT
목적지가 iptables 이 구동되는 현재 리눅스 박스인 네트워크 패킷에 대해서 적용된다. - OUTPUT
리눅스 박스 내에서 생성된 외부로 나가려는 로컬 패킷에 대해서 적용되는 체인이다. - FORWARD
리눅스 박스 밖으로 전달되는 패킷에 대해서 적용된다.
패킷이 테이블내 특정 규칙과 일치할 경우 목적지와 상관없이 특정 행동을 수행하도록 지정할 수 있으며 이를 타겟이라고 한다. 타겟은 다음과 같은 종류가 있다.
- ACCEPT - 패킷을 목적지로 보내는 것을 허용한다. INPUT 체인일 경우 해당 포트를 리슨하는 프로그램에 전달되며 OUTPUT 체인일 경우 목적지 서버로 전송된다.
- DROP - 목적지로 가는 것을 차단하고 패킷을 버리며 패킷의 송신자에게 아무 응답도 보내지 않는다.
- REJECT - 목적지로 가는 것을 차단하고 패킷을 버리지만 송신자에게 에러 패킷을 전송한다. REJECT 시 기본적으로 송신자에게 icmp-port-unreachable 이 전달되며 --rejct-with 옵션 뒤에 송신할 ICMP 에러 유형을 지정할 수 있으며 icmp-net-unreachable, icmp-host-unreachable,icmp-proto-unreachable, icmp-net-prohibited 등을 설정할 수 있다.
- QUEUE - 사용자 스페이스로 패킷을 전달한다.
'프로...NetWork' 카테고리의 다른 글
| Ing> [iptables] iptables 정리 (0) | 2018.09.21 |
|---|---|
| [Tool] nmap - Network exploration tool and security / port scanner (0) | 2018.09.14 |
| [프로토콜] l2tp(Linux xl2tpd) (0) | 2018.09.06 |
| [NAT] 분류 (0) | 2018.09.04 |
| [Linux/Porc] ip sysctl (0) | 2018.08.23 |

